


Artículo: AMZ-B0FP4VMLS5
Halldeli
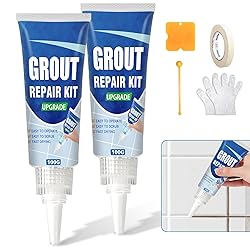
Tile Grout Repair Kit, 2 Pack White Fast Drying Grout Filler for Bathroom, Kitchen, Shower, Replace Grout Pen to Restore and Renew Tile Joints Line, Versatile Triple Use with Grout Sealer (White)
Color:
White
Detalles del producto
Disponibilidad
En stock
En stock
Peso con empaque
0.40 kg
0.40 kg
Devolución
Sí
Sí
Condición
Nuevo
Nuevo
Producto de
Amazon
Amazon
Viaja desde
USA
USA
Sobre este producto
- Are blackened tile joints giving you a headache? Are you still embarrassed by the grimy, old grout on your bathroom floor? Are the yellowing grout in your kitchen countertops making you feel like you haven't cleaned it thoroughly? Don't worry, try our Tile Grout Repair Kit to easily fix these annoying little details and give your home a brand new look! Why Choose Us? First, we've upgraded our formula! Compared to the previous tile grout repair kit, our new grout has a finer texture and stronger coverage. It firmly fills gaps, conceals stains, and resists cracking or peeling. It dries quickly and won't fade. After use, it instantly improves the overall cleanliness of your tiles. Second, our product requires no specialized tools; you can apply it yourself. Simply clean and dry the grout, apply tape along the gap, gently squeeze and apply the grout, and then smooth it out with a spatula. Complete an area in minutes—quick, efficient, and easy. Furthermore, our tile grout repair kit is suitable for a variety of surfaces and spaces, including kitchen floor tiles, bathroom walls, laundry room floors, and even living room tile grout. One bottle can be used for multiple applications, eliminating waste. It's highly adhesive and waterproof, and won't discolor or peel over time. Even better, it's user-friendly: application is odorless and non-disturbing, making it perfect for DIY enthusiasts. Even beginners can easily apply it. Stop putting up with those stubborn, unsightly grouts in your home! Try our new tile grout repair kit and give your floors and walls a brand new look, brightening and refreshing your home! How do I store the tile grout repair kit? We recommend that you store it at a low temperature, which will help extend the use time of the grout adhesive. How do I use the tile grout repair kit? Step 1: Unscrew the caulk tip, remove the aluminum foil, and then install the caulk tip. Step 2: After cleaning and drying the caulk, apply tape along the caulk. Step 3: Squeeze caulk into the caulk container and smooth the paste with a spatula. Step 4: Allow to dry for 24 hours to create a brand new caulk. 1. Application Steps (Standard Installation Process) Most grout sealers and tile repair products sold on Amazon US—especially two-part epoxy-based formulas—follow a similar process. First, clean the tile joints thoroughly by removing old grout, dust, and grease, ensuring the gaps are completely dry. Next, attach the mixing nozzle (for two-part formulas) and dispense the product evenly into the joints, or apply single-component products with a scraper to press the material firmly into place. Then smooth the surface diagonally across the tiles to ensure the joints are fully filled without air pockets. Finally, wipe off excess material from the tile surface with a damp sponge before it dries. Allow the grout to cure fully, typically 24 hours, before exposing it to water or heavy use. 2. Detailed Application Scenarios (Common Use Cases) Grout products are commonly used in kitchens, bathrooms, balconies, and tiled flooring areas—especially around backsplashes, shower walls, bathtub edges, and floor joints where moisture and staining are frequent concerns. In the U.S. market, they are also widely used for basement renovations, rental property maintenance, and home improvement projects. DIY users often apply them for small crack repairs or discoloration touch-ups, while homeowners undertaking larger renovations use them to refresh the overall appearance of tiled spaces. Light-colored tiles are typically paired with white or gray grout, while darker tiles are matched with silver-gray or charcoal tones. 3. Unsuitable Scenarios (Common Misuse Cases) Grout is generally not suitable for expansion joints, structural movement gaps, or wood flooring seams, as these areas require flexible sealants such as silicone caulk to accommodate movement. It is also not recommended for constantly submerged environments (such as swimming pools) unless the product specifically states compatibility. Do not apply grout over loose tiles or unstable substrates. Additionally, installation on oily, damp, or water-leaking surfaces may lead to poor adhesion, discoloration, or premature failure. 4. Precautions (Key Factors Affecting Performance) Ensure all joints are completely dry before application to maintain proper adhesion. For two-part products, complete installation within the specified working time to avoid material waste due to premature curing. The recommended installation temperature typically ranges from 50°F to 90°F (10°C–32°C); lower temperatures may slow curing, while higher temperatures shorten working time. Wear gloves during application and ensure adequate ventilation. Avoid foot traffic or water exposure before full curing. For natural stone or porous tiles, perform a small test area first to prevent staining or absorption marks.
Producto prohibido
Este producto no está disponible
Este producto viaja
de USA ![]() a tus manos en
a tus manos en
![]()
Conoce más detalles
Clean Fill and Protect 3-in-1: This tile grout repair kit fills gaps on vertical or horizontal surfaces with smooth, long-lasting results. The formula provides waterproofing and reinforcement to protect gaps and prevent stains in brick grout Economical Gap Filling Solution: This versatile white fast-drying grout filler comes with a scraper, caulking ball, masking tape, and an easy-to-squeeze tube. No extra tools are needed, so you can easily apply and scrape to complete your tile grout repair, saving significant time and money compared to hiring a professional More Coverage than Grout Pen: This tile grout repair kit uses a new upgraded grout formula that transforms into a true mortar grout after drying, covering stains better than a grout pen and keeping them clean longer, leaving your floors looking brand new Gentle and Easy to Use: This shower grout repair kit features a gentle formula that's safe to use around pets. After cleaning and drying the gap, apply tape along the caulking, squeeze the caulking agent into the caulking, and smooth the paste with a scraper. Wait 24 hours for it to dry naturally for a brand new caulking Complete Kit Included: The package includes two tubes of white grout filler, a scraper tool, caulking ball, and masking tape, providing everything needed for comprehensive tile joint restoration and renewal in bathrooms, kitchens, and showers Fast Drying Formula: The advanced formula dries quickly and firmly adheres to tile joints, resisting cracking, peeling, and fading over time while maintaining waterproof protection for long-lasting durability
Compra protegida
Disfruta de una experiencia de compra segura y confiable
![]() Garantía de entrega
Garantía de entrega
Con Tiendamia todas tus compras cuentan con Garantía de Entrega o devolución total de tu dinero.
Compras 100% seguras y garantizadas, para que pidas lo que sueñas y lo recibas del mundo a tu puerta.
Tarjetas de Débito y Crédito
Visa
Mastercard
American Express
Dinners
Discover
Alias
Pagos a través de PayPal
Compra procesada en dólares con dinero en cuenta o tarjetas internacionales.
PayPal

.svg)